A Week of Gluten Free Air Fryer Recipes

Last weekend my stove broke down. ???? At first we looked into repairing it, but in the end it made more sense to buy a new one.  So, with a new range on order and delivery a week out, the Air Fryer became the star of my kitchen.  With supporting roles from the Rice Cooker and microwave, we were in no danger of going hungry!

These meals are so easy, that I decided to make a little collage of what we had for dinner each night.  Some require a bit of prep, while others need no more than a light brush of oil and sprinkle of seasoning.  All meals are for 2 servings.

This post contains affiliate links.

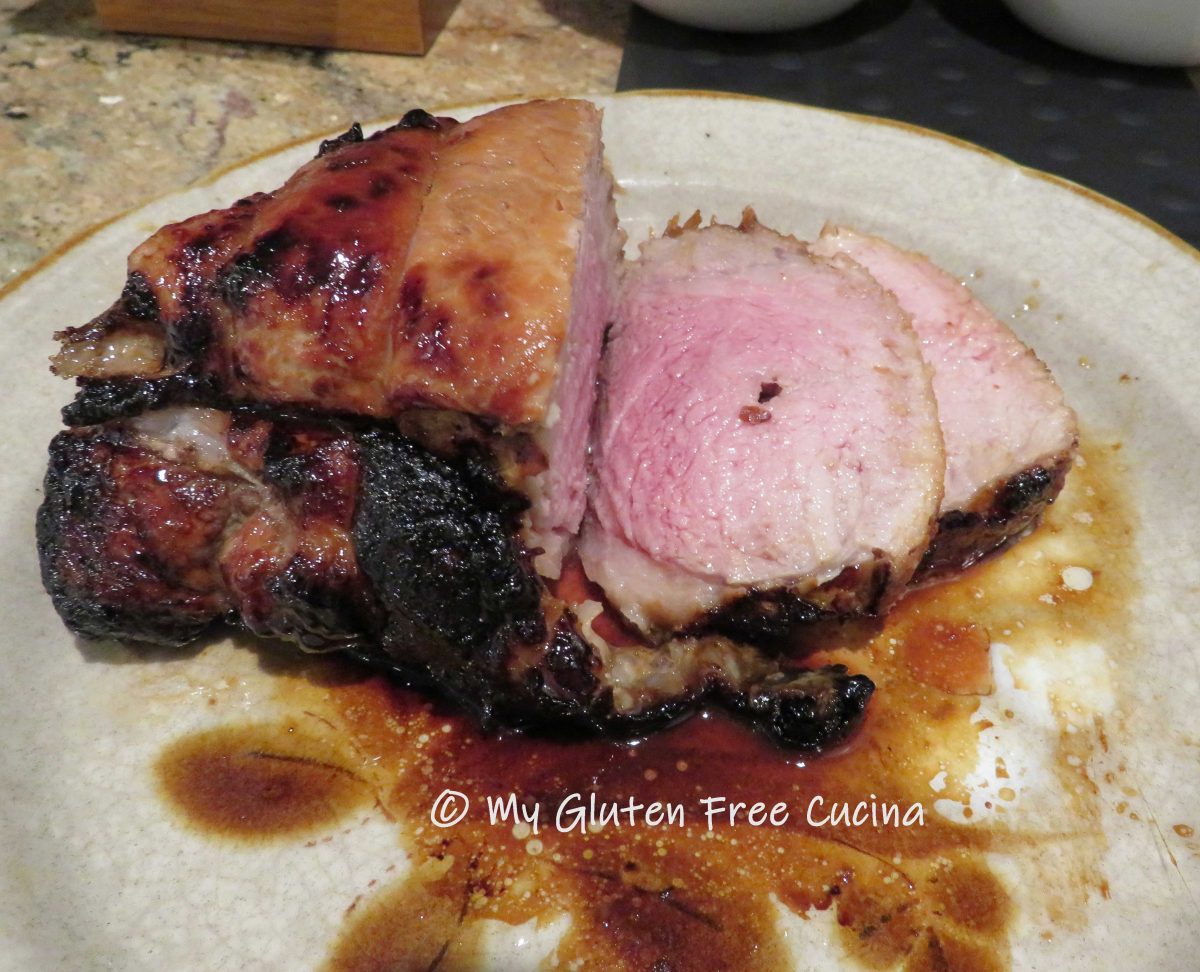
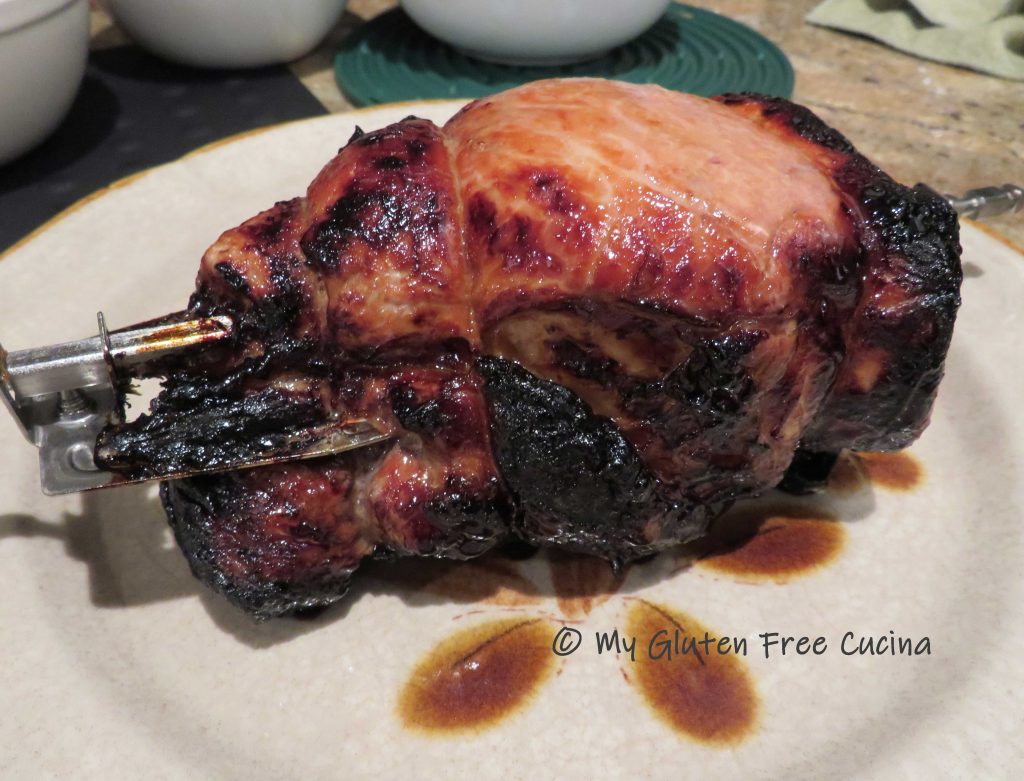
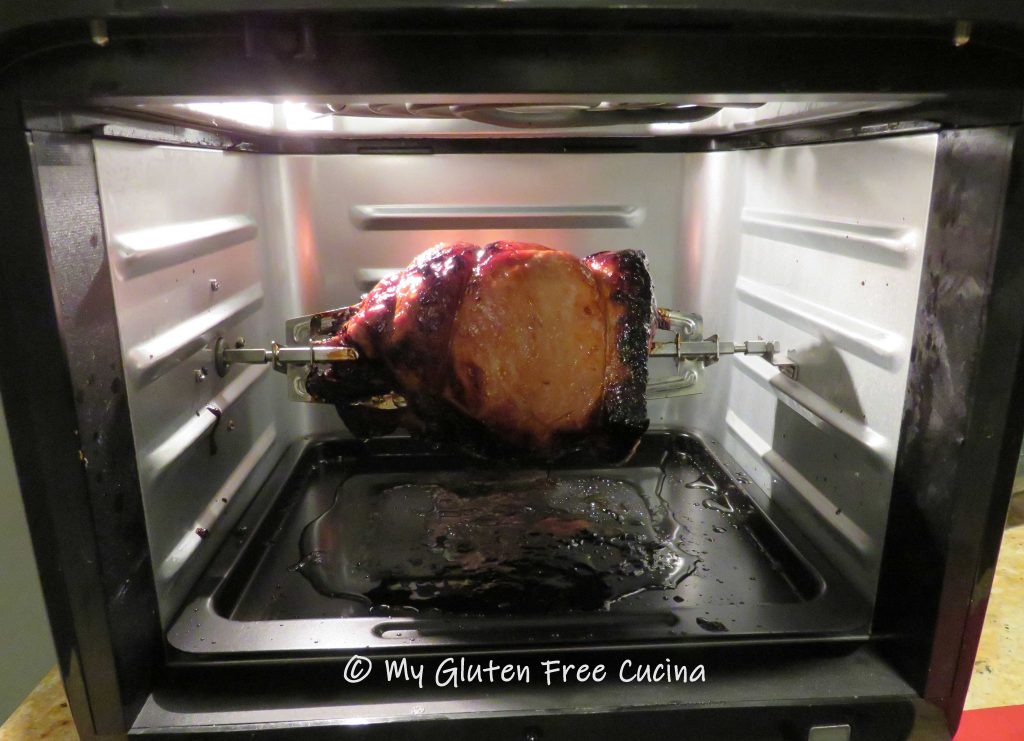
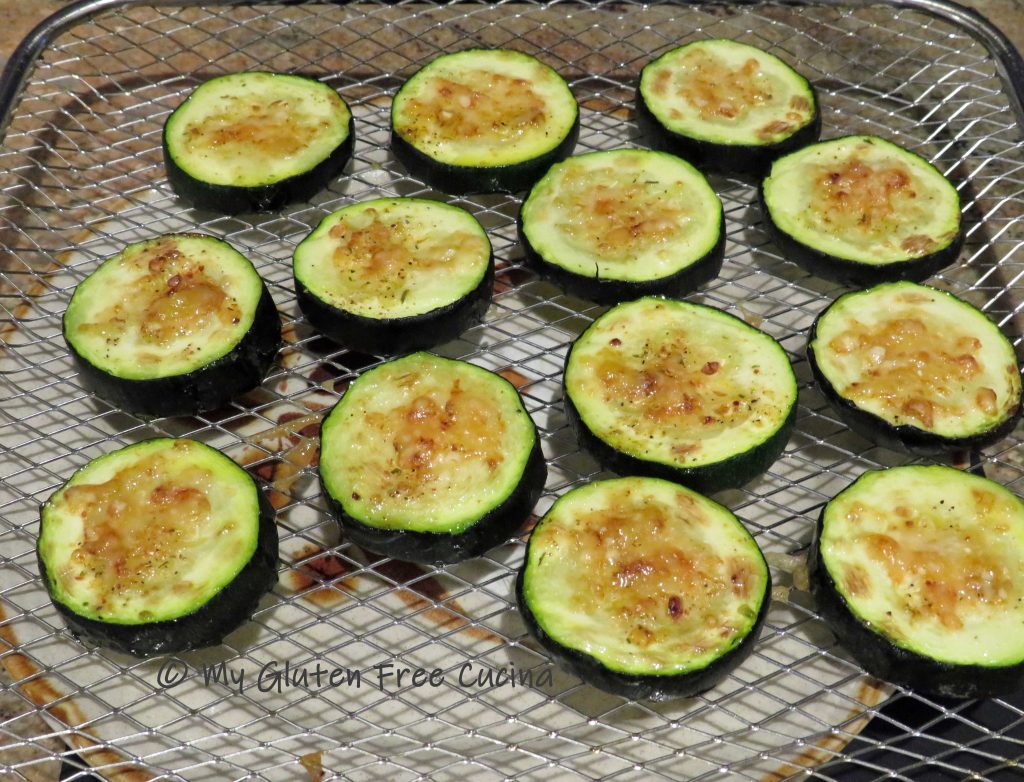
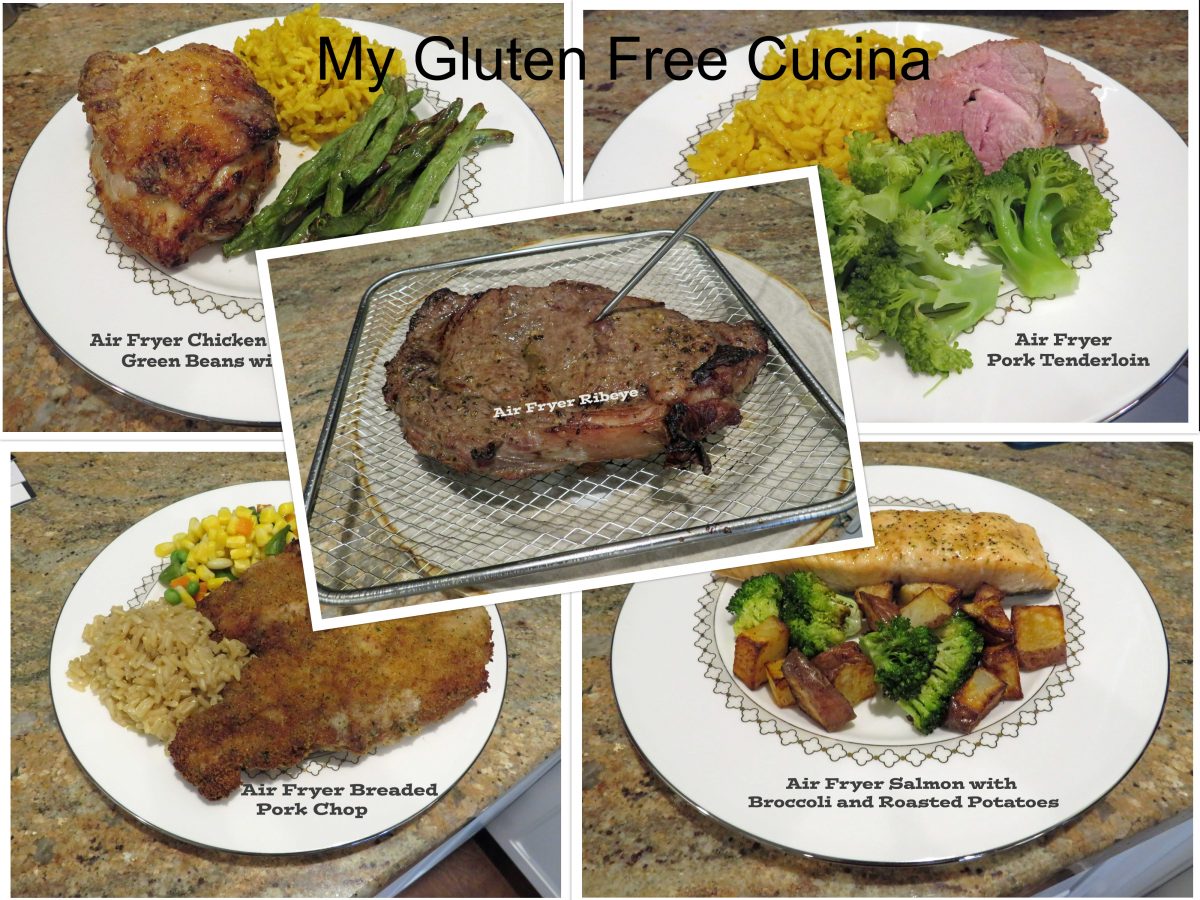
Night #1 Pork Tenderloin, rice and broccoli

First up, an easy pork tenderloin, done in the air fryer using the rotisserie spit.  I brushed a 12 oz. piece of pork tenderloin with olive oil and sprinkled with seasoning.  I air fried it for 20 minutes at 370º.  While the meat was cooking, I made a side of rice and steamed broccoli in my Rice Cooker.  If you like pork tenderloin check out some of these recipes!

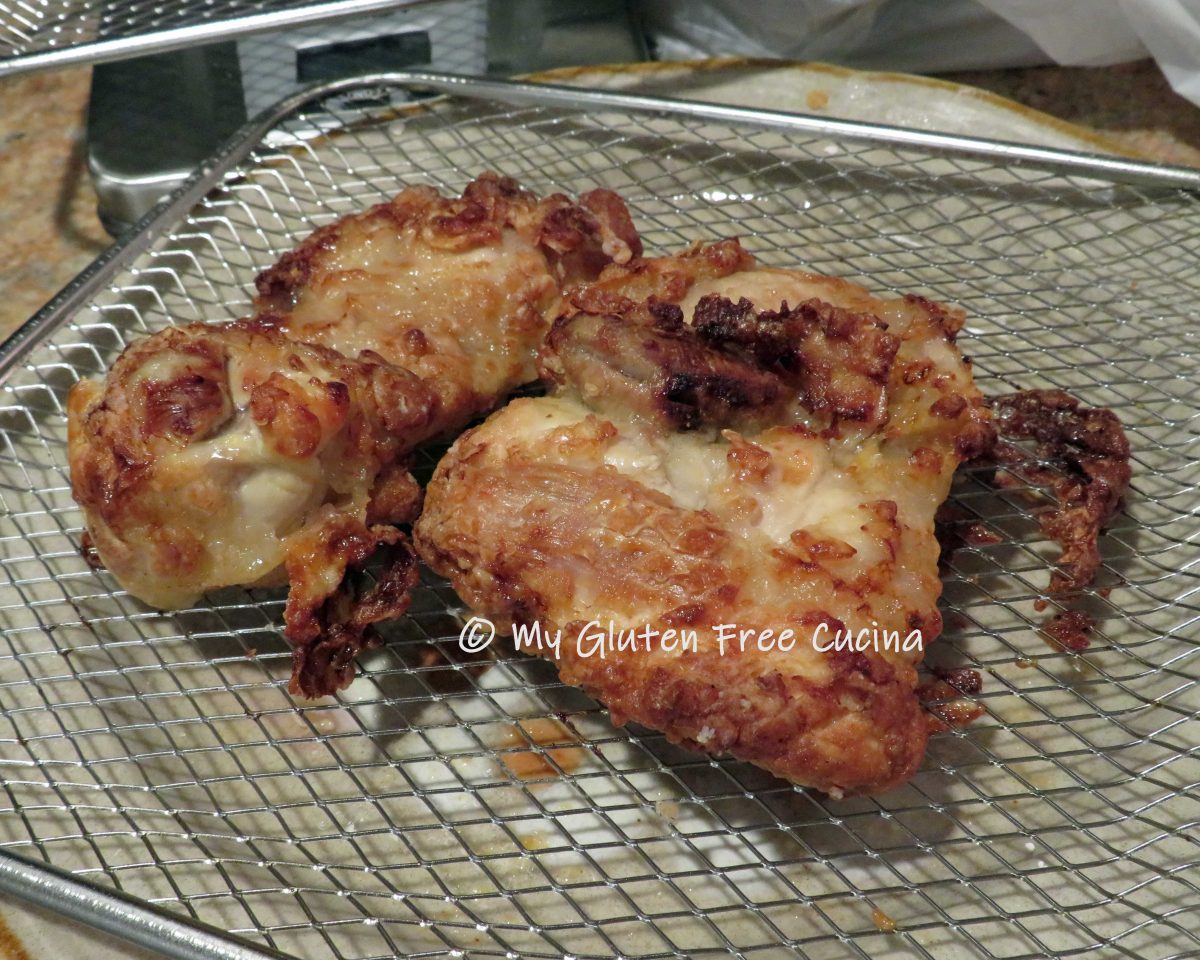
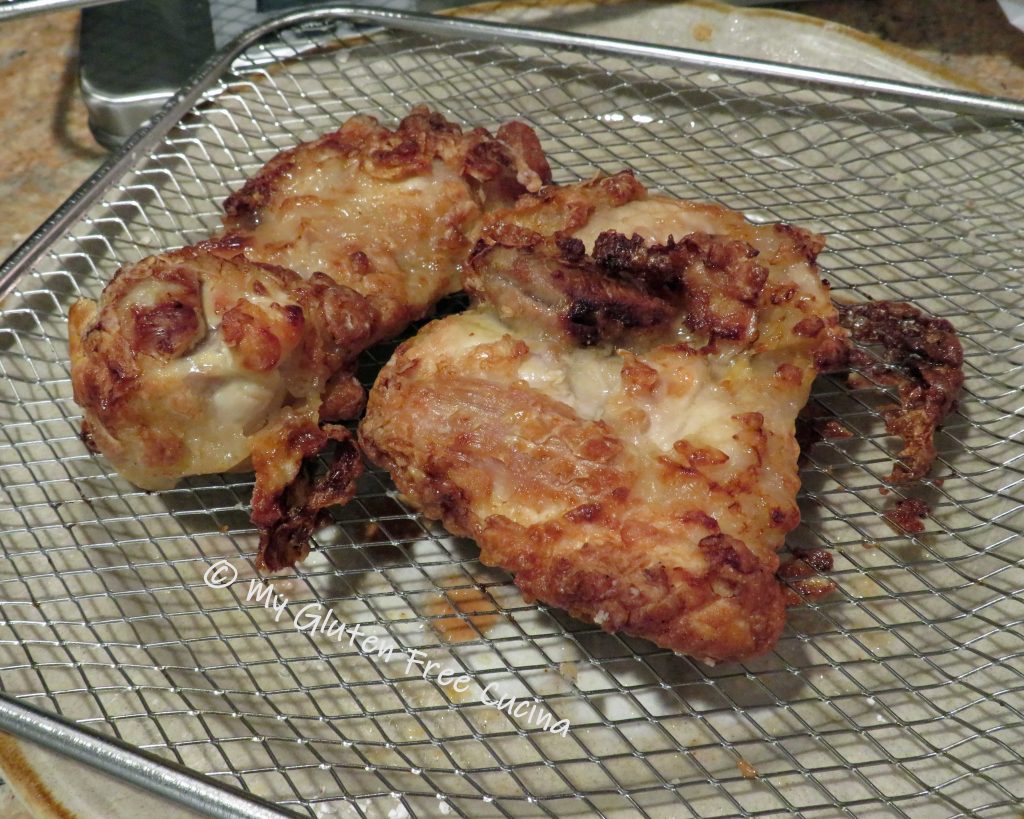
Night #2 Chicken Thighs with green beans, and                              leftover rice

For night 2, I coated 2 chicken thighs with tapioca starch and seasoning, gave it a light spray of oil and air fried for 30 minutes at 400º.  I added green beans to the air fryer during the last 8 minutes.  The rice was left over from the previous meal.  If you liked this meal idea, check out this detailed post on how to make Air Fryer Chicken Thighs.

Night #3  Salmon with Red Potatoes and                                            Broccoli

For night 3, I tossed diced red bliss potatoes with olive oil and seasoning.  I started them in the air fryer at 400º for 20 minutes.  I brushed the salmon with olive and maple seasoning, and added it to the air fryer during the last 10 minutes of cooking.  The broccoli went in for the last 5 minutes.

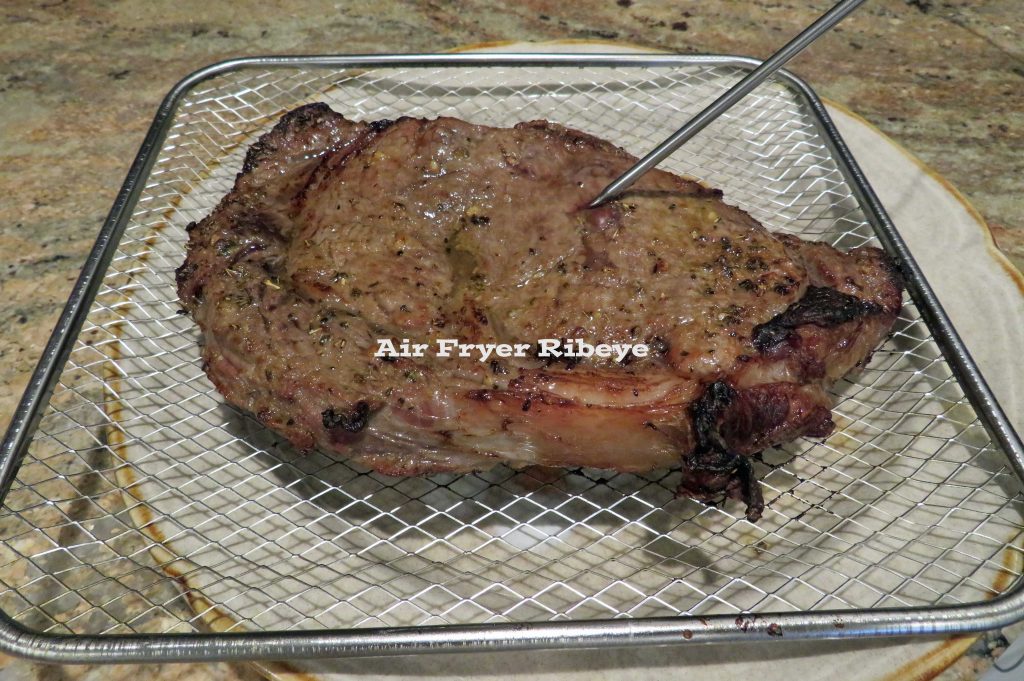
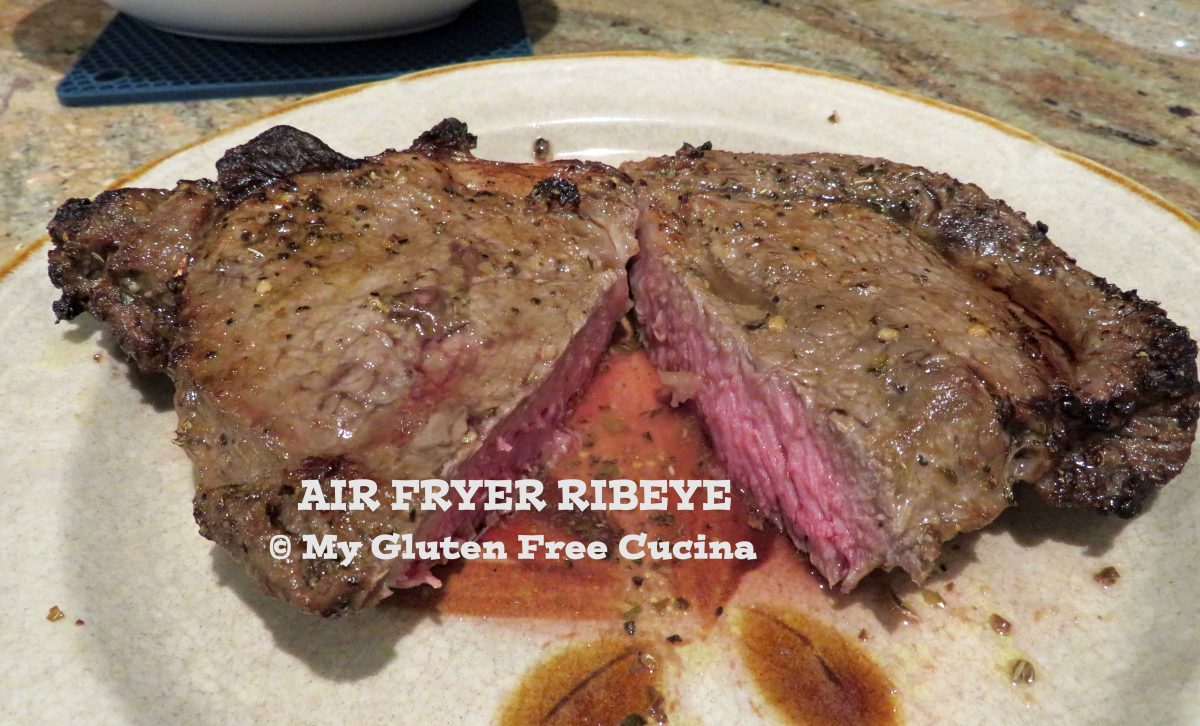
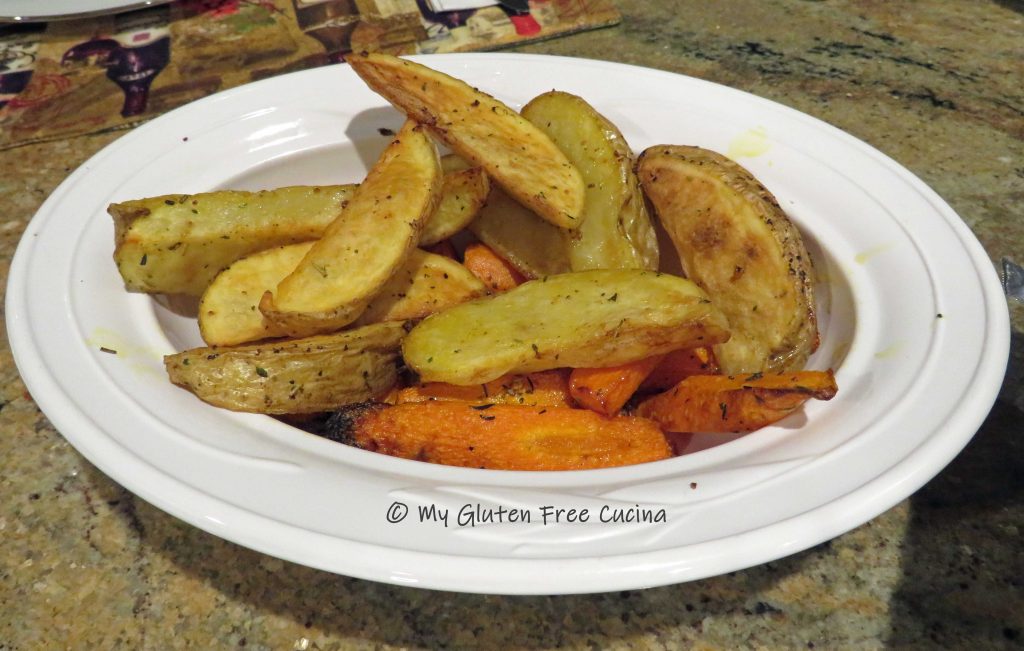
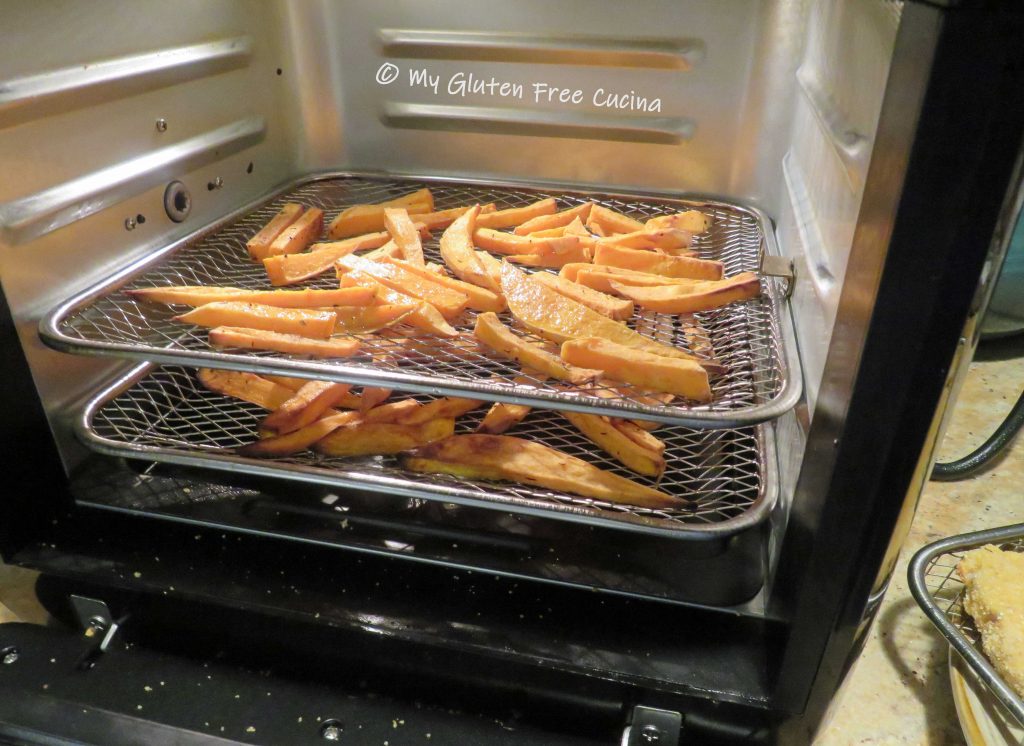
Night #4  Ribeye Steak with Potatoes and Carrots

For this magnificent ribeye, I’ll admit I spent a bit more time on prep.  I started with a 2-hour marinade, then air fried it for 21 minutes at 400º.  I also cooked potato wedges and carrots in the air fryer at the same time.  Read more about it here.

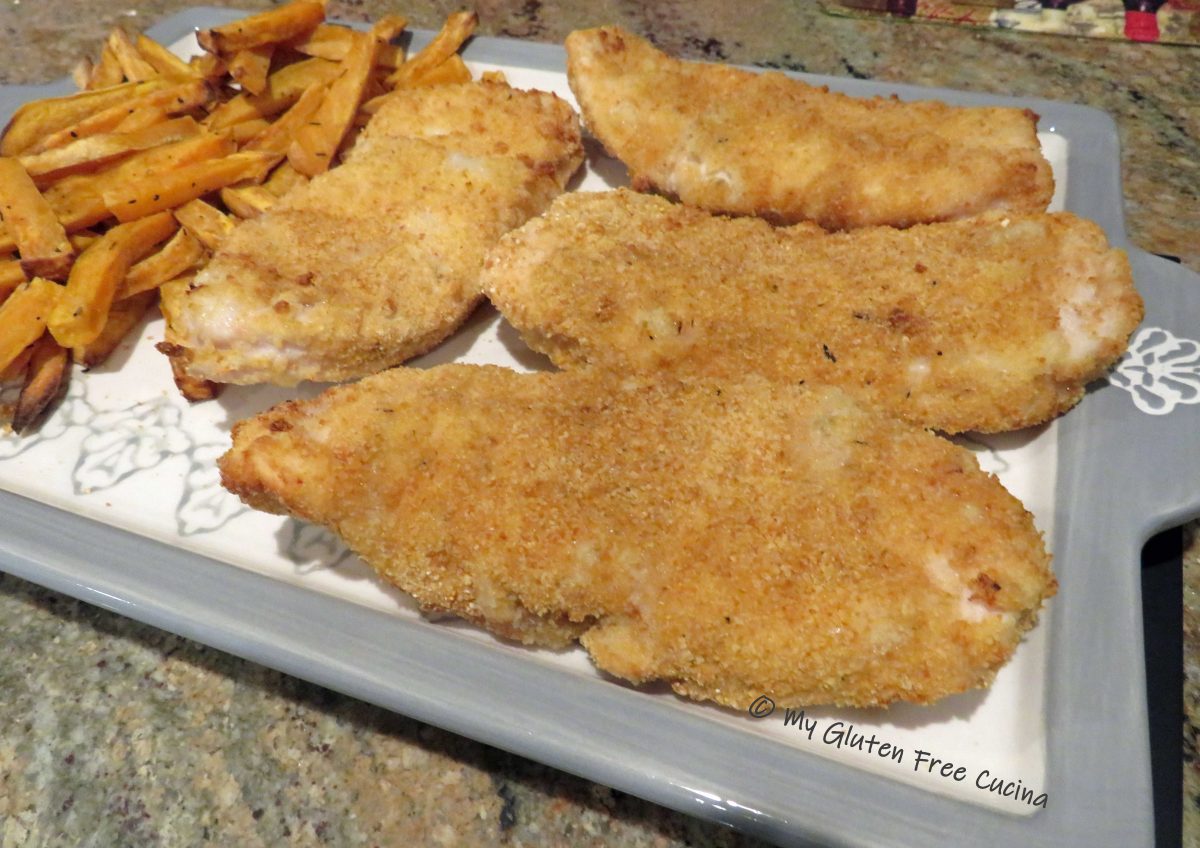
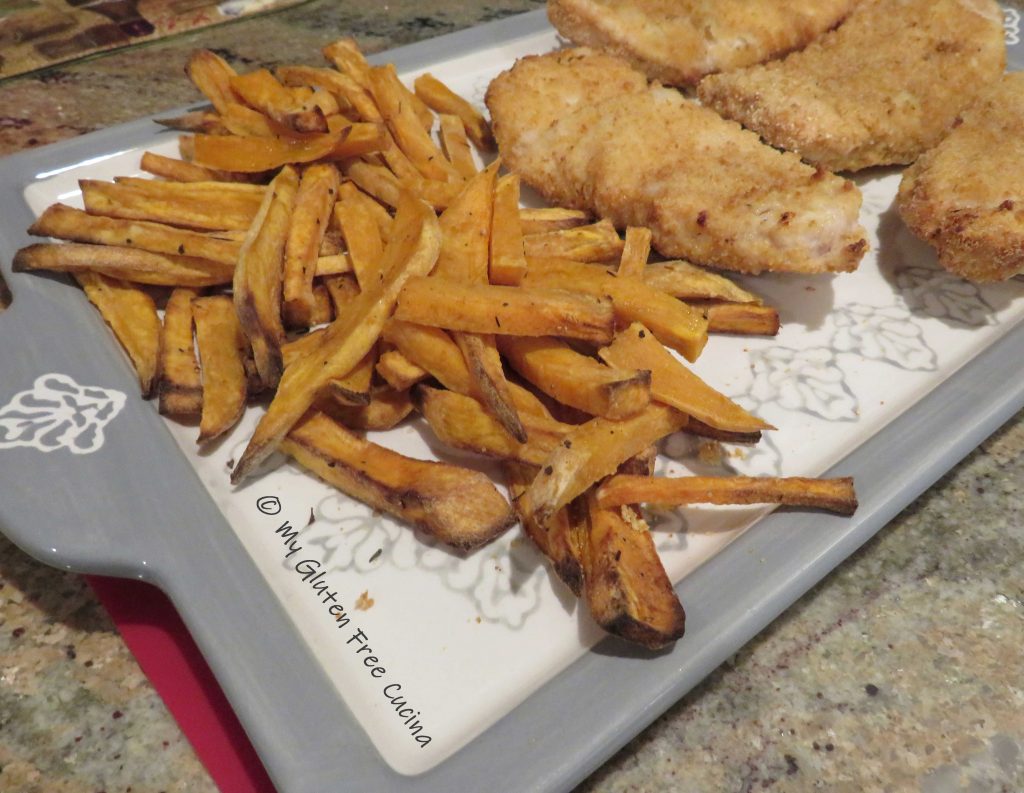
Night #5  Breaded Pork Chops with Brown Rice and                      Mixed Veggies

For our final meal, I cooked 2 pork chops in a traditional flour-egg-breadcrumb combination (yes, they were big!).  I dredged the pork chops in rice flour, dipped them in egg then coated them with gluten free seasoned breadcrumbs.  I let them rest in the refrigerator for about 30 minutes, then air fried them for 20 minutes at 400º.  While the pork chops cooked, I made brown rice in the rice cooker and microwaved frozen mixed veggies.

I hope you got some meal ideas for your air fryer, in case your oven malfunctions like mine did.  Or for when it’s just too hot to light the oven!  These are easy weeknight meals that are perfect for two.  I’m excited to say my new range has since been delivered and I can’t wait to try it out!

Notes ♪♫ Air fryer best practices.  Always preheat the air fryer for 5 minutes before adding the food.  Don’t crowd the air fryer, the air needs to circulate around the food as it cooks.  Turn the food halfway through the cook time for even cooking.  For browning, a light brush or a few sprays of oil will give you that delicious crispy crust.

Print This Post Print This Post


Air Fryer Ribeye Steak

Can you really cook a steak in the air fryer?  This is a question I had never even considered, until the day my stove malfunctioned.

Saturday night is steak night at our house, and my cooking method of choice has always been the reverse sear, which produces a perfectly cooked steak every time.  Read about it here.

Now without a stove, I turned to my other appliances.  Microwave, crock-pot, air fryer?  Hmmm.  Both Mr. Cucina and I were worried about ruining a perfectly good (and expensive) steak.  I did some research and decided to try the air fryer.

The verdict, excellent!  It turns out that yes, you can cook a steak in the air fryer, and it was delicious!

This post contains affiliate links.

Ingredients:

  • 1 lb. ribeye steak, about 1-1/2″ thick
  • gluten free steak marinade (recipe here)
  • cooking spray

Preparation:

Marinate the steak for 2 hours before cooking.  Whisk together the marinade ingredients in a non-reactive dish and add the steak, turning every 30 minutes.

Preheat the air fryer for 5 minutes at 400º.  Remove the steak from the marinade and place on a rack for a few minutes to drain off the excess liquid (if you have a basket style air fryer just pat your steak with paper towel before cooking).

Add 1 tbsp. of water to the bottom tray of the air fryer.  Add the steak and cook 8 minutes per side.

Continue cooking until your steak reaches the desired temperature.  We like ours cooked medium, and it took a total of 21 minutes for mine to reach 145º.

Time will vary from one air fryer to another, so be sure to check the temperature with a meat thermometer.

Also keep in mind that if you are cooking other things in the air fryer at the same time, it will most likely extend the cook time.  I had carrots and potatoes in the air fryer, and it took 30 minutes for the potatoes (started 10 minutes before the steak), and 20 minutes for the carrots.

Important!  Always let the steak rest 5 minutes before slicing.  Place it on a warm plate and cover with foil.  This allows the juices to redistribute and keeps the steak moist and flavorful.

Doesn’t that look good?  It looks like we won’t go hungry while we wait for our new range to arrive.  I can’t wait!

Notes: ♪♫ This dinner for two fit just right in my 3-shelf air fryer.  Potatoes on top, carrots in the middle and steak on the bottom.  You can rotate the shelves during cooking for even results.  Remember that items on the top shelf (closest to the fan) will cook faster, so watch that they don’t burn!

Print This Post Print This Post

Gluten Free Air Fryer Chicken Thighs

Look at those crispy chicken thighs!  Would you believe they were not deep fried?  Of course the title gives it away, this chicken was cooked in an air fryer.  Crispy on the outside, moist and juicy on the inside.  It reminds me of the “bucket of chicken” I loved as a child!  It’s hard to believe this chicken is gluten free!

Now for the real surprise.  These chicken thighs are both boneless and skinless!  That’s right friends, you don’t need the skin to get that delicious crispy coating.  And it’s the best “fried” chicken I’ve had in years.

This post contains affiliate links.

4 Servings

Ingredients:

Preparation:

Whisk together the buttermilk (or use powdered equivalent), and Montreal chicken seasoning.  Buttermilk is not a pantry staple at our house, but I always keep buttermilk powder in the pantry.  Alternately, you can add 0ne tbsp. of lemon juice to regular milk and let the mixture stand for 15 minutes.

Set a clean food grade plastic bag (such as a bread bag) in a medium bowl.

Add the chicken pieces to the bag, and pour in the marinade.

Tie the bag to ensure all pieces are covered in the milk mixture, and let it sit at room temperature 1 hour.

In another plastic bag, add the tapioca starch and paprika.

Add the chicken to the flour mixture one piece at a time, shaking to coat.  Coat air fryer trays with cooking spray and arrange the chicken.  Use 2 trays to allow room for the air to circulate.

Refrigerate the floured chicken for 30 minutes.

Preheat the air fryer for 5 minutes at 400º.  Spray the top of the chicken with cooking spray (Important: you need that little bit of cooking spray to get the crispy crust.  You don’t need to saturate it, just a light even coating of oil.)  Place trays in the air fryer and set to 400º for 30 minutes.

Half way through, turn the chicken over and (don’t forget) spray with cooking spray.  Return to the air fryer, switching positions (the tray that was on top moves to the bottom) and continue cooking for another 15 minutes.  Check the internal temperature with a thermometer.  Thighs are done at 165º-170º.

Don’t they look delicious?  This chicken has become a new family favorite!

Notes ♪♫  The air fryer has been a game changer in my kitchen, as I can now enjoy some old favorites that I haven’t had in years!  Mine is a shelf style, so I was able to air fry all four pieces at once.  If you have a smaller model, or a basket style air fryer you may be limited to how many pieces you can prepare at once.

Print This Post Print This Post

Air Fryer Turkey Cutlets with Sweet Potato Fries

Another win for the air fryer, I made these gluten free breaded turkey cutlets (schnitzel) for dinner and they were so good!  I loved how crispy the breading came out in the air fryer.  Since deep fried food does not agree with me, the air fryer has been a great way to enjoy “fried” food without the tummy aches!

Thin sliced turkey breast cutlets make this recipe fast and easy to prepare.   They are commonly available where we live, but if you can’t find them chicken cutlets would work just as well.  I made sweet potato fries to go with the cutlets for an easy dinner that cooks in 30 minutes!

This post contains affiliate links.

4 Servings

Ingredients:

  • 1 large sweet potato
  • 2 tsp. canola oil
  • 1/2 tsp. maple seasoning
  • cooking spray

……………………………………………………………..

  • 1 lb. turkey breast cutlet sliced thin (4 cutlets, 1/4 lb. each)
  • 1/4 cup white rice flour
  • 1 egg, beaten with 1 tbsp. water
  • 1/2 cup gluten free bread crumbs
  • seasoned salt, to taste
  • cooking spray

Preparation:

Peel the sweet potato and cut into uniform size pieces, about 4″ x 1/2″.  Toss with canola or other neutral oil and season to taste.

Spray 2 trays with cooking spray and divide the potatoes between them.  Start them in a 400º air fryer on the top 2 racks.  They will need to cook 25-30 minutes, and the turkey cutlets will be added during the last 15 minutes of cook time.

While the potatoes cook, prep the turkey.  Set up 3 breading trays with the rice flour, beaten egg and gluten free bread crumbs.  Season each tray.

Work with one cutlet at a time.  Dredge in the flour then dip in the egg, shaking off the excess.

Finally coat with breadcrumbs.  Spray a rack with cooking spray and arrange the breaded cutlets in a single layer.

When the potatoes have 15 minutes left to cook, spray the cutlets with cooking spray and place them on the top shelf of the air fryer.  Move the potatoes to the bottom 2 shelves, use tongs to give them a toss.

After 8 minutes turn the cutlets over and spray the tops with cooking spray.

Finish cooking 7 minutes longer, and everything should be done at the same time.

Dinner was delicious!  The sweet potato fries took a little longer than russet potato, but they were perfectly done at 400º for 30 minutes.

The cutlets are best eaten crispy hot out of the air fryer.  Leftovers can be reheated in the air fryer or enjoyed cold.  They make great sandwiches!

Notes ♪♫  I have a shelf style air fryer and was able to fit both the turkey and the fries onto 3 shelves.  If you have a basket style fryer you may have to cook them separately.

Print This Post Print This Post

Air Fryer Rotisserie Cornish Hen

Cornish Hens are a welcome change from the usual chicken dinner.  I have made them a few times this past year, we even had them for a holiday!

Ever since I got my air fryer last Christmas, I’ve been trying out some of my favorite oven recipes.  I especially love using the rotisserie!  Cook time in the air fryer is less than in a traditional oven, so a recipe that would normally be relegated to a Sunday afternoon is now possible any day of the week!

But really, in the end it’s all about taste.  Both Mr. Cucina and I agreed, this Air Fryer Cornish Hen was juicier and tastier than the oven version!

A possible drawback of most air fryers, you will only be able to cook one hen at a time.  But for our household of two, this was not a problem.  We each had half and it was more than enough for our small appetites.

2 servings, dinner for 2

This post contains affiliate links.

Ingredients:

  • 1 Cornish Hen (mine weighed 2.3 lbs.)
  • 2 tbsp. butter, softened
  • 1 tbsp. olive oil
  • 1 tsp. gluten free seasoning (I used Grill Mates Montreal Chicken)
  • paprika

Preparation:

Soften (don’t melt) the butter by leaving it at room temperature or carefully microwaving 10-20 seconds.  Combine it with the olive oil and seasoning.

Remove the neck and giblets from the hen and discard.  Rinse and pat dry.

Next rub the butter mixture all over the hen, be sure to get under the legs and wings.

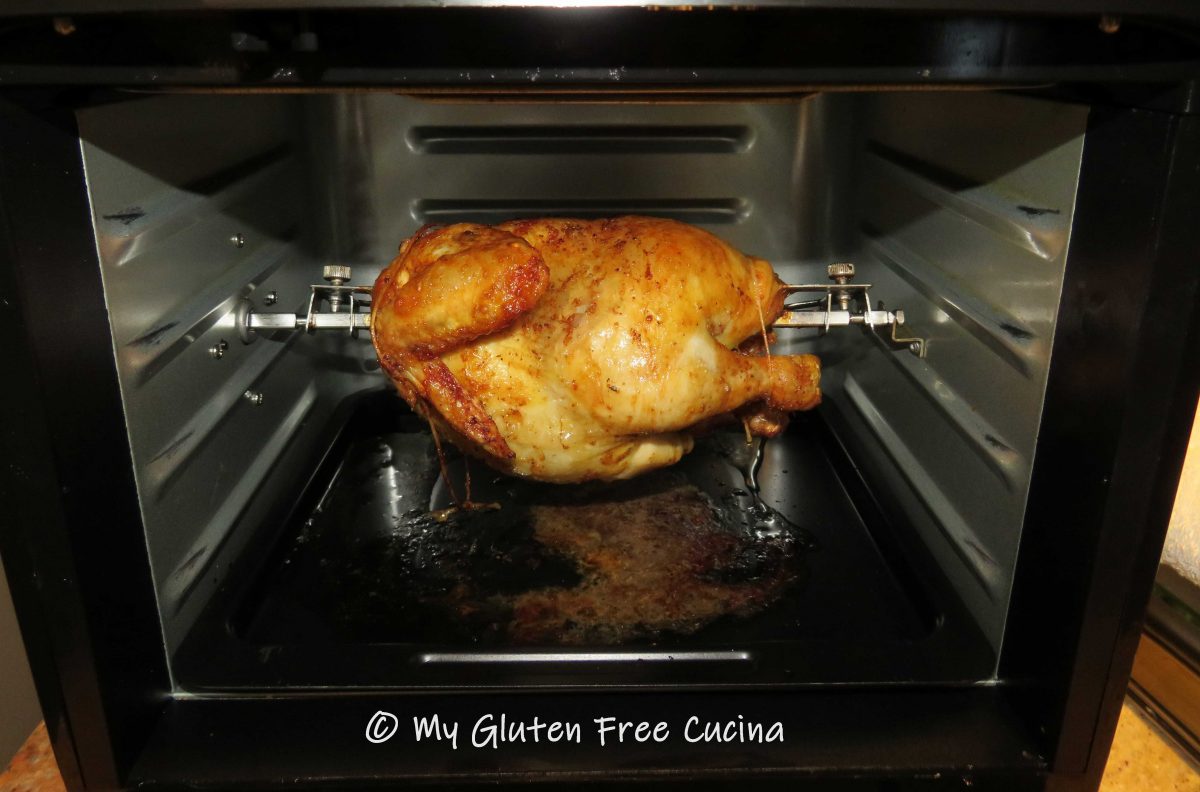
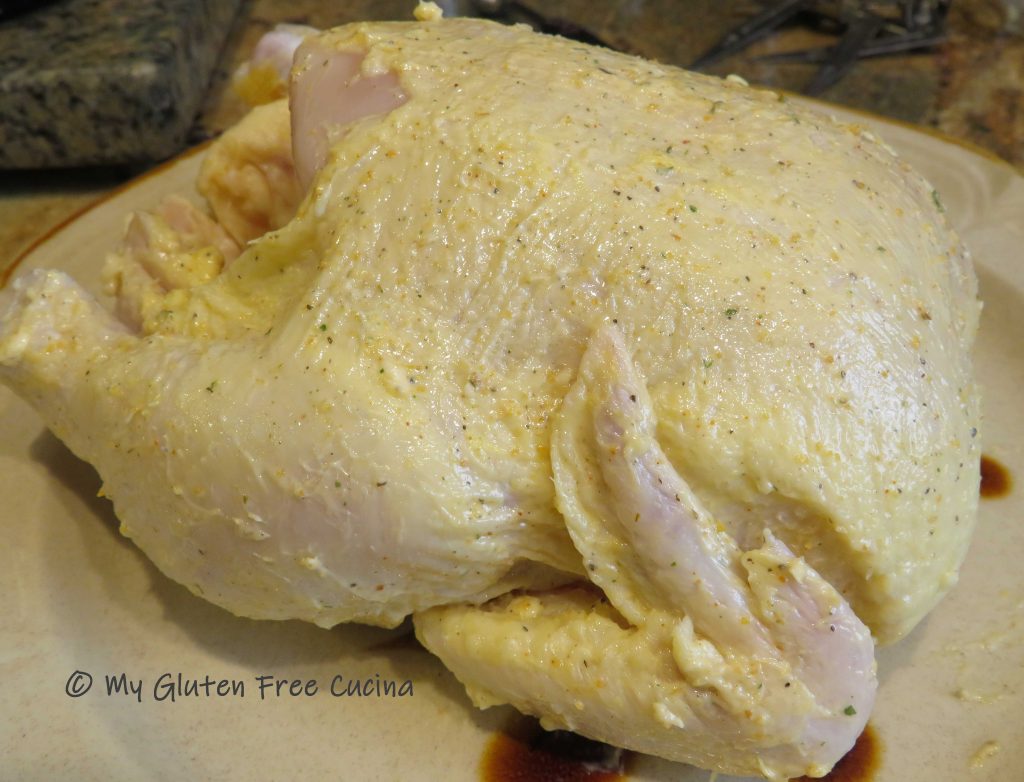
Insert the rotisserie spit and secure the ends with clips, then tie the legs and wings with twine.  Sprinkle all over with paprika.

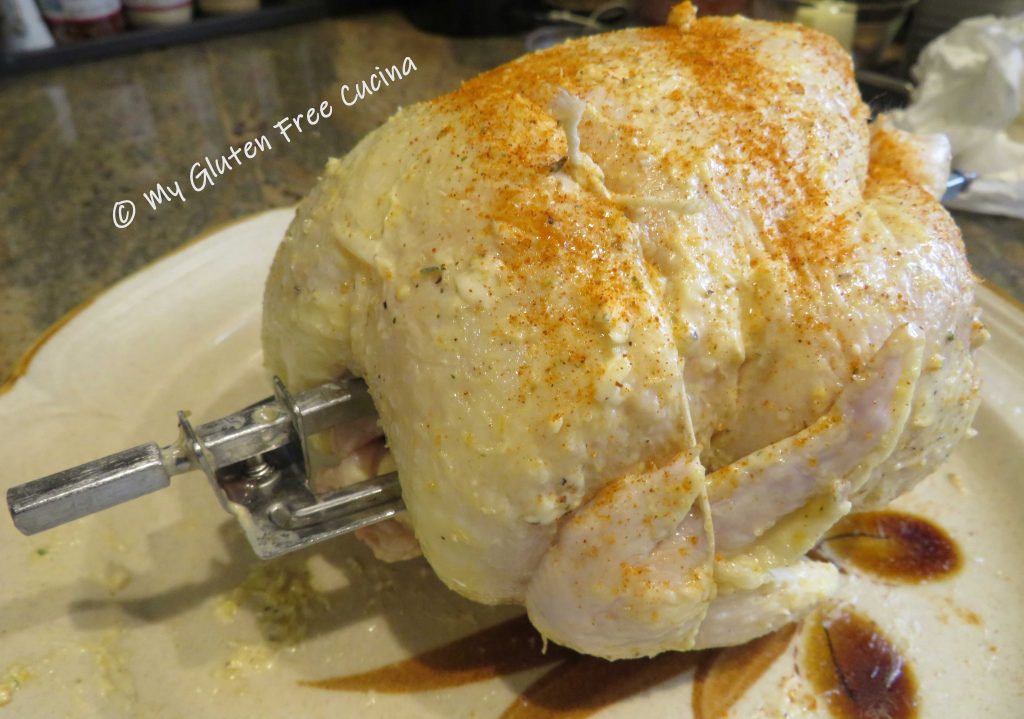
Place the hen in the air fryer for 45 minutes at 375º.

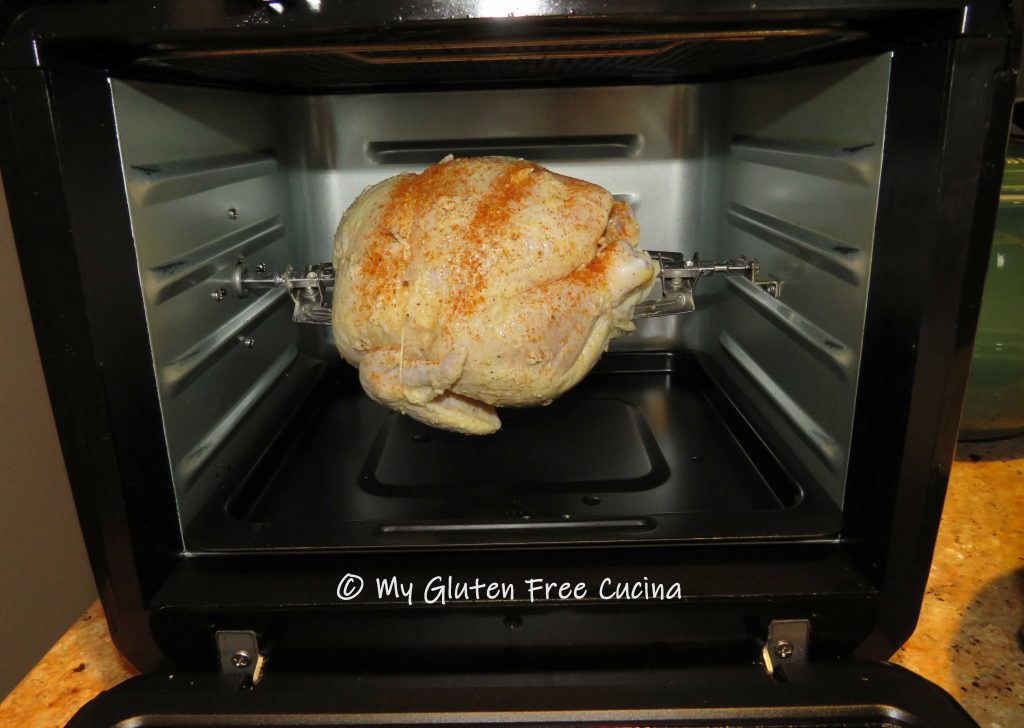
When finished, check with a meat thermometer.  The internal temperature should be between 165º-170º.

Remove to a plate and let it rest a few minutes, then carefully remove the twine and rotisserie spit.

Use a sharp knife and/or kitchen scissors to cut through the backbone and divide the hen into 2 portions.

Notes ♪♫ Every air fryer is different, if yours doesn’t have a rotisserie then you will need to turn the hen every so often for even browning.  Cook time for this recipe was based on a single Cornish hen weighing 2.3 lbs.  Use this as a guide, but always check the internal temperature with a thermometer.


Print This Post Print This Post

Gluten Free Air Fryer Fish and Chips

I haven’t had Fish and Chips in over 5 years!  The last time was long before my Celiac diagnosis, and even back then I didn’t order it often, because of how miserable I would feel afterward.  At the time I just thought that fried food didn’t agree with me.  Who knew?

Today, along with being gluten free, I still avoid fried food.  So I never imagined I would be enjoying Fish and Chips again.

But never say never…

Enter the air fryer.

I’ve had my air fryer for just a few months now (best gift ever!) and have been obsessed with making fries, practicing over and over until I got the cook time and temperature just right.  In my air fryer, 25 minutes at 400º seems to be the sweet spot.  The size of the potato, thickness of the fries, and other food being cooked at the same time will all affect the results.  The fries need to be spread out evenly with plenty of space to get crispy on the outside.

Once I got my fries perfected, Fish and Chips just seemed like the next challenge.  After looking at a few traditional recipes I was able to make a gluten free version and it came out so good!  For the breading, do not use all purpose gluten free flour.  Most of these flour blends are formulated for baking, and contain starches and gums that can make your breading soggy.  In this recipe I used Bob’s Red Mill white rice flour and Gillian’s original gluten free bread crumbs.  Rice flour is far less expensive than all purpose and gets the job done.

Dinner for two

This post contains affiliate links.

Ingredients:

For the Fish:
For the Chips:

Preparation:

I used a russet potato and left the skin on for better texture and nutrition.  Wash the potato and dry completely.  Slice into 1/3″ rounds, then cut into 1/2″ pieces.

Toss with 1 tbsp. olive oil, seasoned salt and a sprinkle of paprika.

Preheat the air fryer for 5 minutes at 400º.  Mist 2 trays with cooking spray and divide the potatoes between the two.  I found that using 2 trays gives a better result, as the potatoes can be spread farther apart in an even layer.  Place trays on the top 2 shelves of the air fryer and set it for 25 minutes at 400º.

While the chips are getting started prepare the fish.  You want a thick, firm white fish for this recipe.  Cod or haddock are the usual choices but today I got this beautiful Sablefish on sale.

Set up 3 breading trays with the rice flour, beaten egg + water, and bread crumbs.  Season each with Old Bay.

Cut the fish into 4 pieces and remove the skin with a sharp knife.

Spray the air fryer tray with cooking spray.  Dip each piece of fish in the flour, then into the egg, shaking off the excess.  Next roll in the breadcrumbs and place on the rack.  Repeat with all 4 pieces.

When the fries have cooked for 10 minutes turn them over and move the trays to the bottom 2 racks.  Mist the fish lightly with cooking spray and place it on the top rack.

Continue cooking 15 minutes longer, turning the fish half way through.  When you turn the fish over, mist the top with cooking spray.   Keep an eye on the fries and watch that they don’t burn.

The fries (or chips) are perfect.  I mean, just look at them!

And here is the fish.  Light and crispy on the outside, moist and flaky on the inside.

The sablefish was amazing, I don’t know if I’ll be able to find it again at a reasonable price, but I will be on the lookout.  As mentioned before, this recipe will most certainly work with cod or any firm, white fish.

This was one of my favorite air fryer meals to date.  I will be making it over and over again!

Notes ♪♫ All air fryers are different.  Cook times given in this post are what works for me and should be used as a guide.  My air fryer is a shelf style (oven style with shelves and rotisserie).  If yours is a basket style, you will need to cook the fish and chips separately.  Cook the potatoes first as they take longer, and keep warm while you do the fish.  When the fish is ready you can reheat the fries for a minute or two.

Print This Post Print This Post

Air Fryer Rotisserie Pork Loin Roast

How lucky am I?  I got an air fryer for Christmas and I’ve been using it quite a bit these days!  Trying all my favorite recipes and experimenting with timing and temperature, keeping notes on what works and what doesn’t.  Yes, I’ve been busy, and while I am far from being an expert with this newest kitchen gadget, I am excited to start sharing our successes at the dinner table.

Pork Tenderloin Roast

This simple Pork Tenderloin was one of my first and best efforts to date!  If you have followed me for a while, you know that a pork loin roast is one of my go-to menu choices for holidays and family meals.  With its simple preparation, it allows me more time for side dishes or just enjoying time with guests!  Check out this Easy Pork Tenderloin Roast wrapped in prosciutto, an easy main course that I have made many times!

Today’s recipe was adapted from another family favorite, my Apple Glazed Pork Tenderloin.  I had always baked it in the oven but was curious to see how it would turn out in the air fryer.

This post contains affiliate links.

I bought a 3 lb. pork loin roast and cut it in half, which is plenty for the two of us and just the right size for the Air Fryer.  Like my original recipe, I made a simple basting sauce from apple juice concentrate, ketchup and honey. I inserted the roast onto the rotisserie spit, and tied it with twine to help keep its shape.  Basted once before cooking and again half way through.

The verdict, amazing!  I have never had a pork roast come out so juicy.

Ingredients:

  • 1-1/2 lb. pork tenderloin
  • 6 oz. frozen apple juice concentrate (half can)
  • 1 tbsp. ketchup
  • 1 tbsp. honey
  • pinch of thyme and red pepper flakes (optional)

Preparation:

Whisk the apple juice concentrate, ketchup, honey, thyme and red pepper flakes in a small saucepan and simmer to thicken.

Insert the rotisserie spit through the center of the roast and secure the ends with clips.  Tie the roast with cooking twine every 2″.

Pour some of the marinade into a separate bowl for basting, and reserve the rest for the table.  Brush the roast liberally and place it in the air fryer.

Cook for 40 minutes at 370º, basting again half way through.  Start checking the internal temperature at 30 minutes.

When the internal temperature reaches 140º remove to a plate or cutting board and let it rest for at least 5 minutes.

Carefully remove the clips and slide the roast off the rotisserie spit.  Slice and serve with reserved apple glaze.

Notes ♪♫  This Air Fryer Pork Tenderloin was so moist and juicy, much better than my earlier recipes cooked in a conventional oven.  I experimented with the apple based marinade vs. a dry rub and the marinade was most definitely the winner.  A 1.5 lb. roast was cooked perfectly at 370º for 40 minutes, so you will need to adjust the time for a larger or smaller cut.  A meat thermometer is the best way to check.  And don’t forget to let the meat rest before slicing, so it will retain the juices!

Print This Post Print This Post 

Air Fryer Pork Chops and Zucchini Rounds

The air fryer is a godsend when you are running short on time but want to cook a healthy meal from scratch.  The beauty of a recipe like this is that it allows the flavors of fresh ingredients to shine through, plain and simple.  Look how easily I put this dinner together!

This post contains affiliate links.

For the pork chops:

Brush the pork chops lightly with olive oil and sprinkle with seasoning.  Place on a rack misted with cooking spray.  Air fry for 15 minutes at 400º, turning every 5 minutes.  The internal temperature should be 145º.

For the Zucchini:

  • 1 zucchini, sliced into rounds
  • Olive oil
  • Seasoning
  • Grated parmesan
  • cooking spray

Brush or spray the zucchini lightly with olive oil and sprinkle with seasoning.  Top each round with ½ tsp. grated cheese.  Place rounds 1″ apart on a tray misted with cooking spray.  Add the zucchini to the air fryer when the pork chops have 7 minutes remaining cook time.  They do not need to be turned.

I served the pork chops and zucchini with a side of brown rice cooked in gluten free chicken broth.  A basic, healthy meal for your family on the table in under 30 minutes.

Notes ♪♫  I find the trickiest part of using an air fryer is determining the right cook time and temperature.  There are so many variables, including the size, shape and weight of your meat, other items being cooked at the same time, etc.  You can use a chart like this one as a guide, but I find that using a meat thermometer is essential.

Print This Post Print This Post